The Art
Joan Nathan is known to many as the Queen of Challah. She published her favourite version of the recipe in the New York Times, in 2001. Today, nearly 25 years later, it’s still one of the most popular destinations on their website, and for good reason.
Interesting Fact: Joan was one of the first popular challah bakers to recommend proofing the dough three times, with the second one preferably overnight in the fridge. It’s this long, cold proof that contributes so much to the rich flavour of her bread. If you have the fridge real estate and time, I strongly recommend it.
Strengths: This dough makes a fabulous bread. It’s rich, eggy, sweet, and fluffy. It’s the perfect loaf for a Shabbat blessing, or other special occasion. With hundreds of challah recipes on the web to choose from, you can’t go wrong with this beauty. It’s a one-bowl dough, with no fancy extra steps.
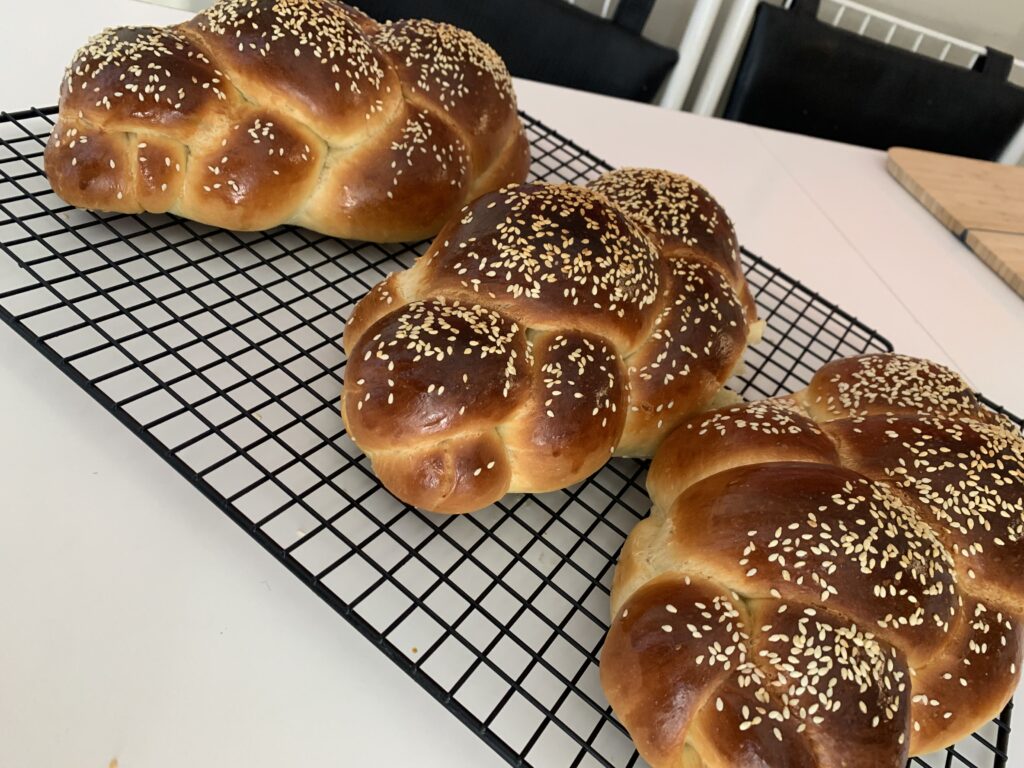
Challenges: My family loved this challah; however, I did have several challenges when making it. Joan likes her challah dark, and I prefer mine light. As you can see from the photos, above, mine came out quite dark. Another challenge was timing. It took my challahs twice as long to proof. Instead of the suggested 2.1/2 hours at room temperature, they took 5 hours. Luckily, I started early in the day!
Finally, this is a very sticky dough. I ended up using all of the flour in the recipe because it was rather wet at the one minute mixing mark, and, still, with all that added flour the finished dough ended up quite sticky. Sticky dough isn’t bad, per se, in fact, it usually makes for a light fluffy bread; however, it is hard to handle for most bakers, and it’s particularly tricky for beginners.
The Science
Challah is an enriched dough. The added eggs, sugar and oil naturally inhibit yeast development, making for a slow rise. Some people overcome this by adding more yeast, but too much can lead to unpleasant tasting bread. Proofing the dough overnight in your fridge is another solution, as Joan suggests. The cold temperature slows down yeast activity, giving the gluten a chance to catch up and get stronger, thus encasing those wonderful gases.
Another option is to extend the proofing time, as I did, but keep a close eye on it to make sure it doesn’t over-proof. That can lead to a flat, dense bread. Do the poke test often to stay on top of it.
Finally, if your kitchen is on the cool side, place the dough in a warmer location (a friend puts her dough in her boiler room!). Sometimes the gluten isn’t the problem. Sometimes the yeast is too cold to activate properly. The Desired Dough Temperature that is optimal for proper fermentation in enriched dough is about 75 degrees F.
How to lighten a dark crust: The Maillard Effect in baking is a chemical reaction that occurs when sugars (white, brown, honey, lactose, etc.) and proteins (amino acids) are heated, causing the surface to brown. If you prefer a lighter crust, there are a couple of ways to achieve this. When you see the bread is browning too quickly in the oven, cover it loosely with foil or place an empty sheet tray above it. Either way, you will reduce the heat exposure by shielding the top of the bread, and that can help a lot. Lastly, you can reduce the oven temperature, but be careful. If the temperature is too low, the bread will take longer to bake, and that extra time in a hot oven may dry it out significantly.
How to handle sticky dough: Most people choose to add more flour to sticky dough, but too much flour can change the composition of the dough, giving you a dense finished product. Perhaps, the best way to work with sticky dough is to have fast hands. That means to keep the dough moving, quickly. Another hack is to wet or lightly grease your hands.. Dough scrapers help, too. If you’re not comfortable with any of these methods, cover the dough tightly with plastic wrap, and place it in the fridge for an hour or two to chill, then try again. Many people don’t give it much thought but once you mix flour and water, the gluten develops on its own. Still, you will get better, quicker and more consistent results if you knead it either by hand or in a mixer.
Adapted Recipe*
Yield: Two large or three medium loaves.
Mix Method: Intensive mix; straight dough (no preferment).
| Weight | Ingredient | Baker’s % |
| 960 g – 1020 g (8-8.1/2 c) | All purpose flour | 100% |
| 420 g (1.3/4 c) | Water | 41.2% |
| 10 g (1.1/2 pkg) | Instant yeast | 1% |
| 200 g (4 large) | Eggs, large | 19.6% |
| 112.5 g (1/2 c + 1 tbsp) | Sugar, granulated | 11% |
| 17 g (1 tbsp) | Salt, fine table | 1.7% |
| 120 g (1/2 c) | Oil, vegetable | 11.8% |
*Adapted to include metric weights and instant yeast
Directions:
- Make a slurry by whisking the yeast with 1 tbsp sugar and 420 grams warm water in the bowl of a stand mixer.
- Whisk the oil into the slurry, then beat in the four eggs, the remaining sugar and salt. Switching to the dough hook, on speed 1 (KA sift), gradually add the flour until the dough comes together, then scrape down the bowl. Slowly increase to speed 2 (KA 4) and knead until the dough is smooth and elastic, about 8-12 minutes.
- Cover the dough with plastic wrap and allow it to rise in a warm place until it’s nearly doubled in size, about one hour. Gently degas the dough, cover again, and allow it to rise for another 30 minutes.
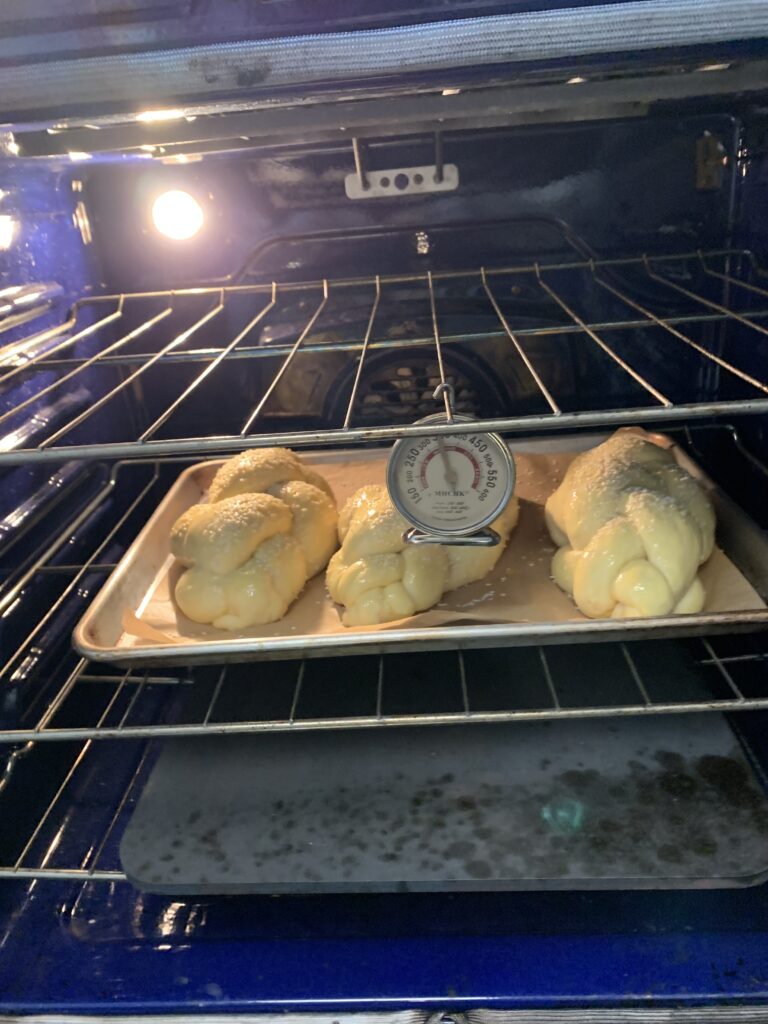
- Braid or coil the challahs, then brush the tops of the loaves with a well-beaten egg. Allow the dough to rise for one more hour. Preheat the oven to 375 degrees F.
- Brush loaves one more time and then bake in the middle of the oven for 35 to 40 minutes, or until an instant read thermometer in the centre of the bread reaches 190 degrees F.
- Remove from the oven and place on a wire rack to cool.
I highly recommend you check out Joan’s original recipe. If you have trouble accessing the New York Times online, contact your local library. Oftentimes, they offer free temporary access either online or in the branch.
Leave a Reply